Msai - 미니프로젝트3 MMDetection(Animal Datasets)
MSAISchool 공부에 대한 내용을 작성해 보았다.
- Msai - 1주차(1)
- Msai - 1주차(2)
- Msai - 1주차(3)
- Msai - 포커이미지 분류
- Msai - 미니프로젝트 2 MMDetection(Wine Label Datasets) and JSON to yolov5
- Msai - 미니프로젝트 3 MMDetection(Animal Datasets)
- Msai - 공부하면서 알게된 것 1
Animal Label Object Detection(MMDetection)
미니 프로젝트 3
2023년 1월 31일(화)
1) Dataset 구성
- ainmals.v2-release.coco
- test
- images(jpg), _annotations.coco.json
- train
- images(jpg), _annotations.coco.json
- valid
- images(jpg), _annotations.coco.json
- README.dataset.txt
- README.roboflow.txt
- test
- Dataset는 아래 테이블과 같이 구성되어 있습니다.
| Data | 이미지 개수 |
|---|---|
| Test | 100 |
| Train | 700 |
| Valid | 200 |
- Category는 아래 테이블과 같이 구성되어 있습니다.
| Category Number | Category Name |
|---|---|
| 0 | animals(Background) |
| 1 | cat |
| 2 | chicken |
| 3 | cow |
| 4 | dog |
| 5 | fox |
| 6 | goat |
| 7 | horse |
| 8 | person |
| 9 | racoon |
| 10 | skunk |
2) MMDetection 적용
2-1) train_tool.py를 만들어 준다.
#2023년 1월 31일 미니프로젝트 3 animaals 데이터 클래스는 10개이다.
#필요한 패키지를 추가해주었다.
import mmcv
import torch

from mmdet.apis import init_detector, inference_detector
from mmdet.datasets.builder import DATASETS
from mmdet.datasets.coco import CocoDataset
from mmdet.datasets import build_dataset
from mmdet.models import build_detector
from mmdet.apis import set_random_seed
from mmdet.apis import train_detector
from mmdet.utils import collect_env, get_root_logger, setup_multi_processes
from mmcv.runner import get_dist_info, init_dist
from mmcv import Config

# Dataset regiset 데이터 셋에 등록이 필요하다
# 포맷 자체가 CoCo데이터 셋을 가져온다.
@DATASETS.register_module(force=True) # 등록을 해준다.
class AnimalLabelDataset(CocoDataset): # 상속을 받게 된다.
    # CoCo데이터 셋에는 클래스가 1,000개인데, 우리가 원하는 클래스를 지정해준다
    CLASSES = ('animals', 'cat', 'chicken', 'cow', 'dog', 'fox', 'goat', 'name', 'person', 'racoon', 'skunk')

# config
# config파일을 불러와야 한다
config_file = './configs/dynamic_rcnn/dynamic_rcnn_r50_fpn_1x_coco.py' # 해당하는 아키텍처를 가져온다.(faster_rcnn을 많이 쓴다. dynamic_rcnn도 많이 쓴다., centernet, mask_rcnn은 세그멘테이션에서 사용한다., cascade_rcnn도 많이 쓴다.(cascade_rcnn_r50_fpn_1x_coco.py많이씀))
cfg = Config.fromfile(config_file) # config를 읽어 들인다.
# 어디에 num_classes가 있는지 확인을 해야 한다.
# 아래 print(cfg.pretty_text)를 사용해서
# print(cfg.pretty_text) # 해당하는 파일들을 가져온다.

# Learning rate setting
# single GPU -> 0.0025
# cfg.optimizer.lr = 0.02/8 <- 보통은 8개 GPU를 사용하기 때문에 이렇게 해준다.
cfg.optimizer.lr = 0.0025 # learning rate를 설정해준다.

# dataset setting
# 데이터 셋을 설정해준다
cfg.dataset_type = "AnimalLabelDataset" # coco_detection.py에 있는 것을 바꾸어준다.
cfg.data_root = "./animals.v2-release.coco" # 루트를 지정해준다.

# train, val, test dataset >> type data root and file img_prefix setting
# coco_detection.py에 있는 3가지(type, ann_file, img_prefix) 부분을 변경해준다
# 경로 설정을 해준다. coco_detection.py에 있는
# agmentation을 해주려면 train_pipeline쪽에서 수정을 해주어야 한다.
# trian 작성
cfg.data.train.type = "AnimalLabelDataset"
cfg.data.train.ann_file = "./animals.v2-release.coco/train/_annotations.coco.json"
cfg.data.train.img_prefix = "./animals.v2-release.coco/train/" # 데이터셋만 지정하면 뒤에 알아서 train이 붙는다.

# val 작성
cfg.data.val.type = "AnimalLabelDataset"
cfg.data.val.ann_file = "./animals.v2-release.coco/valid/_annotations.coco.json"
cfg.data.val.img_prefix = "./animals.v2-release.coco/valid/"

# test 작성
cfg.data.test.type = "AnimalLabelDataset"
cfg.data.test.ann_file = "./animals.v2-release.coco/test/_annotations.coco.json"
cfg.data.test.img_prefix = "./animals.v2-release.coco/test/"

# class number
# 항상 이 부분을 주의해야 한다.
# faster_rcnn_r50_fpn.py에서 수정을 해준다.
# 로이 안에서 80인 부분은 11으로 변경해준다.
# 접근 방식을 .으로 접근하면 된다.
cfg.model.roi_head.bbox_head.num_classes = 11

# 8로하게 되면 작은 물체가 더 작아지기 때문에 4로 수정한다.
# small object -> change anchor -> df : size 8 -> size 4로 수정한다
# 8이면 스케일이 켜지는 것인데 작은 이미지는 더 작아지게 되므로 4로 하게 해주었다.(안그러면 작은 데이터를 더 작게 만든다.)
cfg.model.rpn_head.anchor_generator.scales = [4]

# pretrained call
# pretrained를 가져온다. 모듈을 가져온다. 아키텍처에 해당하는 pth파일을 가져와야 한다.
cfg.load_from = "./dynamic_rcnn_r50_fpn_1x-62a3f276.pth"

# train model save dir
# train 모델을 저장하는 경로를 지정한다. (모델을 저장할 공간을 설정해준다.)
cfg.work_dir = "./work_dirs/0131"

# lr, hyp setting
# 러닝 레이트랑 하이퍼파라메타를 세팅한다.
cfg.lr_config.warmup = None
cfg.log_config.interval = 10 # 10번째 마나 띄워준다. # 어느정도에서 볼지 정해준다.

# coco dataset evaluation type = bbox
# coco 데이터 셋 평가 타입을 bbox로 잡는다. (그러면 0.5 ~ 0.95사이의 값을 갖는다.)
# mAP iou threshold 0.5 ~ 0.95
cfg.evaluation.metric = 'bbox'
cfg.evaluation.interval = 10 # 언제쯤 볼지 정해준다.
cfg.checkpoint_config.interval = 10 # 언제쯤 저장을 해줄지 해주는 것이다.
# 투스테이션에서는 best를 뽑을 수는 없다.

# epoch setting
# 보통 8 x 12정도로 하게 된다. -> 96(8개 GPU를 사용할 때, 12번 돌린다)
# num work랑 gpu를 설정해주는 방법이다.
cfg.runner.max_epochs = 88 # 90정도의 에포크를 돌린다. 데이터가 충분히 있다면 88정도 해주어도 괜찮다.
cfg.seed = 777
cfg.data.samples_per_gpu = 6 # 싱글로 할 때는 6하고 2는 고정이다.
cfg.data.workers_per_gpu = 2
# print("cfg.data >>", cfg.data)
cfg.gpu_ids = range(1) # gpu가 몇개인지 개수를 파악하는 것이다.
cfg.device = "cuda"
set_random_seed(777, deterministic=False)
# print("cfg info show", cfg.pretty_text)

datasets = [build_dataset((cfg.data.train))] # 트레인용 데이터 셋을 생성하는 것이다.
# print("dataset[0]", datasets[0])

# datasets[0].__dict__ variables key val
datasets[0].__dict__.keys()

# 모델을 불러주는 것이다.
model = build_detector(cfg.model, train_cfg=cfg.get("train_cfg"),
                       test_cfg=cfg.get('test_cfg'))
model.CLASSES = datasets[0].CLASSES
# print(model.CLASSES)

if __name__ == "__main__":
    train_detector(model, datasets, cfg, distributed=False, validate=True)
2-2) inference.py을 만들어 준다.
- train_tool.py을 통해 학습된 epoch.pth를 사용하여 test 이미지에 적용을 시켜준다.
- inference.py를 작성할 때는 train_tool.py에서 작성하였던 내용과 동일하게 적용시켜주어야 한다.
# 2023년 1월 31일 오전 수업
import cv2
import json
import os
import numpy as np
from mmdet.apis import inference_detector, init_detector
from mmdet.datasets import build_dataset
from mmdet.models import build_detector
from mmdet.datasets import DATASETS
from mmdet.datasets.coco import CocoDataset
from mmcv import Config
from mmdet.apis import set_random_seed

# Config 설정 (Train과 동일하다)

# 1. Dynamic RCNN setting ...
# config파일을 가져온다.
config_file = "./configs/dynamic_rcnn/dynamic_rcnn_r50_fpn_1x_coco.py"
cfg = Config.fromfile(config_file) # 이렇게 해줘야 Config를 사용할 수 있다.
# 2. DATASET.register
@DATASETS.register_module(force=True) # 데이터 세트를 가져온다.
class AnimalLabelDataset(CocoDataset): # 상속을 받게 된다.
    # CoCo데이터 셋에는 클래스가 1,000개인데, 우리가 원하는 클래스를 지정해준다
    CLASSES = ('animals', 'cat', 'chicken', 'cow', 'dog', 'fox', 'goat', 'name', 'person', 'racoon', 'skunk')

# 3. dataset setting ...
# 하이퍼파라메터를 세팅해준다.
# 데이터 타입과 데이터 루트
cfg.dataset_type = "AnimalLabelDataset"
cfg.data_root = "./animals.v2-release.coco"

# train, val, test dataset에 대한 type, data_root, anno_file, img_prefix, hyp setting ...
cfg.data.train.type = "AnimalLabelDataset"
cfg.data.train.ann_file = "./animals.v2-release.coco/train/_annotations.coco.json"
cfg.data.train.img_prefix = "./animals.v2-release.coco/train/"

cfg.data.val.type = "AnimalLabelDataset"
cfg.data.val.ann_file = "./animals.v2-release.coco/valid/_annotations.coco.json"
cfg.data.val.img_prefix = "./animals.v2-release.coco/valid/"

cfg.data.test.type = "AnimalLabelDataset"
cfg.data.test.ann_file = "./animals.v2-release.coco/test/_annotations.coco.json"
cfg.data.test.img_prefix = "./animals.v2-release.coco/test/"

# 4. model class number setting ...
# 로이 헤더에 위치해 있다고 하심.
cfg.model.roi_head.bbox_head.num_classes = 11

# 5. pretrained model
cfg.load_from = "./dynamic_rcnn_r50_fpn_1x-62a3f276.pth"

# 6. weight file save dir setting ...
cfg.work_dir = "./0131"

# 7. train setting hyp
cfg.lr_config.wrmup = None
cfg.log_config.interval = 10

# 8. CocoDataset metric -> bbox (bbox mAP iou threshold 0.5 ~ 0.95까지 변경하면서 측정한다.)
cfg.evaluation.metric = 'bbox'
cfg.evaluation.iterval = 10
cfg.checkpoint_config.interval = 10

# Epoch setting
cfg.runner.max_epoch = 10
cfg.seed = 0
cfg.gpu_ids = range(1)
set_random_seed(0, deterministic=False)

# Model Load
checkpoint_file = "./work_dirs/0130/epoch_40.pth"
model = init_detector(cfg, checkpoint_file, device="cuda") # 학습했던 정보를 동일하게 넣어 주어야 한다.
# pretrained를 사용했던 것 까지 넣어주어야 한다.

"""
# one image result show
# 한장의 이미지에 대해서 볼 수 있다.
from mmdet.apis import show_result_pyplot
img = "./dataset/test/511_jpg.rf.b70e77817865b09f7004a1a82401c850.jpg"
# cv2에 이미지를 넣어준다.
images = cv2.imread(img)
results = inference_detector(model, images)
# mmdetection에서 한장의 이미지를 보고 싶을 때, show_result_pyplot을 만들어 둔 것이다.
show_result_pyplot(model, img, results)
"""

img_info_path = "./dataset/test/_annotations.coco.json"
with open(img_info_path, 'r', encoding='utf-8') as f:
    image_info = json.loads(f.read())

# threshold
score_threshold = 0.7

# annotation을 만들기 위한 리스트를 만든다.
submission_anno = list()

# image one -> inference
# 이미지를 하나씩 순회 하면서 inference를 보는 것이다.
for img_info in image_info['images']:
    file_name = img_info['file_name']
    img_height = img_info['height']
    img_width = img_info['width']
    img_path = os.path.join("./dataset/test/", file_name)
    # cv2를 하려면 cv2로 읽어야 한다.
    image = cv2.imread(img_path)
    image_copy = image.copy()
    image_resize = cv2.resize(image_copy, (960, 540)) # 리사이즈를 해준다.

    # scale 스케일을 계산해준다.
    x_scale = float(960) / img_width
    y_scale = float(540) / img_height
    # print(x_scale, y_scale) #2.0 1.7419354838709677
    # 우리가 구한 x, y에 곱해주면 된다.

    results = inference_detector(model, img_path) # 경로로 넣어 주어도 동작을 한다.
    for number, result in enumerate(results):
        # 아무것도 없다면 continue해준다.
        if len(result) == 0:
            continue
        # threshold setting ...

        # json으로 만들기 위해 카테고리아이디를 해줌
        category_id = number + 1

        # 변수를 하나 만들어 준다.
        result_filtered = result[np.where(result[:,4] > score_threshold)] # 0.5이상인 애들만 나오게 된다.
        if len(result_filtered) == 0: #
            continue
        for i in range(len(result_filtered)) : # 살아남은 애들만 for문을 돌려준다.
            # print(result_filtered) # [[  4.6392226  206.71797     14.983432   261.69467      0.88920397]]
            tmp_dict = dict()

            x_min = int(result_filtered[i, 0])
            y_min = int(result_filtered[i, 1])
            x_max = int(result_filtered[i, 2])
            y_max = int(result_filtered[i, 3])

            # xyxy to xywh
            # json을 만들어 주기 위해 만들어 준다.
            json_x = x_min
            json_y = y_min
            json_w = (x_max - x_min)
            json_h = (y_max - y_min)
            # print(json_x, json_y, json_w, json_h) # 4 206 10 55

            tmp_dict['bbox'] = [json_x, json_y, json_w, json_h]
            tmp_dict['category_id'] = category_id
            tmp_dict['area'] = json_w * json_h
            tmp_dict['image_id'] = img_info['id']
            tmp_dict['score'] = float(result_filtered[i, 4]) # i의 4번재 값을 뽑아온다.

            submission_anno.append(tmp_dict)
            # 그리고 json 덤프를 하면 된다.

            # scale bbox
            x1 = int(x_min * x_scale)
            y1 = int(y_min * y_scale)
            x2 = int(x_max * x_scale)
            y2 = int(y_max * y_scale)
            cv2.rectangle(image_resize, (x1, y1), (x2, y2), (0, 255, 0), 2)

            # cv2.rectangle(image, (x_min, y_min), (x_max, y_max), (0, 255, 0), 2)
    # cv2.imshow("test", image_resize)
    # if cv2.waitKey() == ord('q'):
    #     exit()

            # voc -> coco xywh

            # print(x_min)
            # exit()

    # json을 만들어 주기 위해 dump를 사용해서 만들어 준다.
    with open("./json_test/test.json", 'w', encoding='utf-8') as f:
        json.dump(submission_anno, f, indent = 4, sort_keys = True, ensure_ascii=False)
3) 테스트 이미지 적용 결과
- 테스트 이미지 하나를 사용하여 바운딩 박스를 해준 결과입니다.
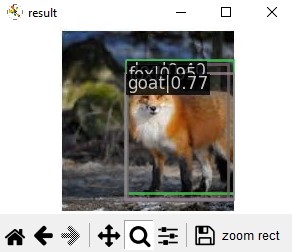
- 사진에서 볼 수 있듯이 여러개의 바운딩 박스가 그려져 있는 것을 볼 수 있습니다.
- 클래스 이름이 가려져 있지만 fox가 0.95로 잡히고, goat는 0.77, cow는 0.40으로 잡히는 것을 볼 수 있었습니다.
-
다른 테스트 이미지들을 여러개 적용을 해보았는데, 다른 이미지들에서는 바운딩 박스는 잘 잡히지만 물체에 맞는 클래스를 제대로 찾아내지 못하는 현상을 보였습니다.
- 바운딩 박스를 사용한 후 json파일로 만들었습니다.
![]()